| Disassembly |
Last updated Last updated 23 December 1999
Many thanks to Ray Gannon for his help in supplying photos and instructions for this procedure!
WARNING: Unless you're a skilled electronics technician, there's little or nothing inside the QuickTake 200/DS-7 that you can repair or replace. And taking the camera apart, unless you're very careful, can easily damage it—permanently. (Needless to say, it will also void your warranty.) In short, don't attempt this unless you know what you're doing and are prepared to risk the possible consequences.
| Initial disassembly |
First, turn the camera off and remove the batteries and the SmartMedia card. It's a good idea to have a small cup or cups handy for storing small parts, and to cover your working surface with a soft cloth to prevent scratching the exposed lens. You'll need to remove five screws, using a small Phillips screwdriver (put the screws in a cup so you won't lose them):

- inside SmartMedia compartment (1 screw)
- inside I/O connector compartment (1 screw)
- inside battery compartment (1 screw)
- on bottom plate, adjacent to tripod socket (2 screws)
Now with a small knife blade or a jeweler's flat-bladed screwdriver, gently and carefully pry the camera apart at the groove (visible between the front and back halves of the case) on the bottom. There is one latch on the bottom (like the ones on top) near the screw in the battery compartment. Starting there makes the job a lot easier. Make sure the tool does not go more that about 1/8" deep.

As the bottom gets to about 1/2" of separation, the latches on the top will pop loose. DO NOT PULL THE CASE APART TOO FAR—the two halves are connected by flex cables and if you tug on them, they can rip out permanently. Gently pull the halves of the camera apart until the top gap is about 1/2", then lay the camera on its face with the top away from you and flip the camera back up and over until it's lying on the table. Here's the camera opened up, with the most interesting parts labeled:
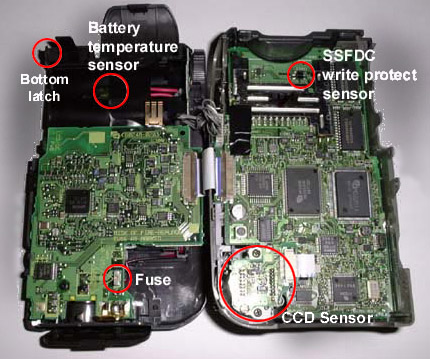
Once you have the camera open, the trouble-prone DC input fuse is accessible. You'll find the details on how to replace this fuse—and where to get a new one—on the Fuse page.
 Return to the QuickTake 200/Fuji DS-7 Users' Page
If you have tips or suggestions about either of these two cameras, or if you've found any accessories I haven't mentioned here, send email to Andy Baird so I can put the information on this page.