


Improving Gertie: the rear lounge |
Brightening upGertie's interior was fairly dark—perhaps that was the style in the mid-Eighties when she was built. (The carpet is a bit shaggy, come to think of it...) And I didn't like the fake rough-sawn wood paneling. So I gave the same Con-Tact treatment I'd used on the bathroom door to the rest of Gertie's cabinets and doors. It's easy to apply, looks like off-white Formica inserts, and greatly lightens up the coach's formerly dark interior. Total cost was under $20, and I love the new, lighter look! 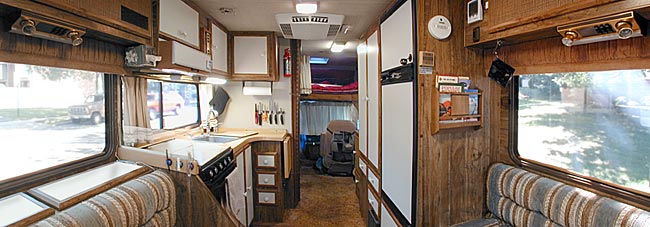
New carpetLightening up the cabinets was a big improvement, but the old, shaggy brown carpeting still darkened the interior. I wanted to replace it with something lighter and more contemporary, but I couldn't afford to spend the money for a professional to do the job...and when I asked about carpeting by the foot at local flooring stores, it sounded as though the carpeting alone would cost me an arm and a leg. I wanted a quick, cheap way to do the job. One day as I was entering a Home Depot store I saw a rack of inexpensive area rugs outside with a "SALE" sign on it. For $29 I bought myself a 6' x 9' beige cut-pile carpet with bound edges, made from "100% unknown fibers," according to the label. It was perfect. (An RVing friend had warned me that looped-pile carpet could catch and hold pine needles, making for painful walking...so cut pile was what I was looking for.) I installed it in the simplest possible way: I laid it over the old carpet. (Yes, I know this is frowned on...but I have a history of getting away with things you're not supposed to do. ;-) 
I've found that the Home Depot parking lot is a great place to work on Gertie. I park in a far corner of the lot where I'm not bothered by traffic, and do whatever needs doing. If I need materials or tools, I just walk into the store and take my pick—no need to get in the car and drive to a hardware store to buy another package of screws. It's a wonderfully convenient place to work. I laid out the rug in the parking lot next to Gertie and made careful measurements of the interior with the tape measure I always carry, then transferred them to the rug using a Sanford Sharpie. Cutting the shapes with my tin snips, I brought the rug in and laid it over the old carpeting. It fit with just a little trimming in a couple of places, and by carefully laying out the shapes to make best use of the 6' x 9' carpet (less than two square feet went unused), I was able to cover almost the entire floor...from under the table in back all the way to the "doghouse" in the cab, and down the entry stairs. The only living-space floor I didn't cover was the bathroom. (I may replace that carpeting with vinyl flooring eventually.)
I had one seam between the kitchen and the bathroom, but covered it with a light oak molding strip (a quick walk into the Home Depot store got me that item). A seam at the top of the entry stairs and carpet edges toward the front were covered with extruded aluminum "splice plates" and edge trim.
Total cost for my quick-and-dirty recarpeting job: just over $40 in materials and four hours' labor. I actually enjoyed sitting out there in the parking lot, working at my own pace with Paul Desmond playing on the stereo. And the result looks great and feels good underfoot. (Why shouldn't it, with two layers of cushioning underneath it—the original padding and the Lazy Daze carpet?) Here's how the old and new carpet compare—you can see how much lighter the new carpet is! It makes the whole interior feel that much lighter. (See the panorama above for comparison!) Wall pocketsThe Lazy Daze-installed bookrack always bothered me. It was bulky but didn't hold very much (because the wood was so thick), and what it held you couldn't see very well. So I replaced it with two clear-plastic wall pockets (three for $14.98 at Staples), each of which holds twice as much as the old wooden rack—and in plain view. 
Removing the old rack was trickier than I'd expected, though, because it turned out that it was screwed to the wall from the other side—the other side in this case being the inside of the refrigerator housing. In short, I could not get to those screw heads without pulling the entire fridge all the way out of the wall, and there was no way I was going to attempt that! I solved the problem in a simple but effective way: I hit the wooden rack with a hammer until it fell apart. I didn't just randomly bash at it, mind you. I figured out where the nails were that held it together, and then I knocked off the sides, top and bottom cleanly with a few well-placed taps. That left me with just two horizontal boards still screwed to the wall. Tapping them a few times tore them loose from their screws, leaving just the screw points protruding from the wall. Then I grasped each screw point with pliers and carefully twisted it clockwise until it was flush with the wall. A final, gentle push with a screwdriver tip, and the screw fell back inside the wall. (No, I wasn't worried about the screws getting into the refrigerator's works—all the goodies are in back; the sides are just insulation.) That left the wall clear for the two plastic pockets, which mounted with four screws each. I mounted the third wall pocket up front, near the entrance, figuring that I could use it for maps or temporary campground documents. 
Sideboard: storage plus work spaceLiving full-time in a 22' rig is a challenge when it comes to finding places to put things! One way I dealt with this was to trade seating for storage and work space: I replaced one of my two couches with a "sideboard" consisting of nine drawers, a storage bin, and a plywood work surface. You can read all about this project, which added 15 cubic feet of storage and 12 square feet of work area to Gertie, on the Sideboard page. A Jotto Desk for the computer
I had been very uncomfortable when working on the computer at Gertie's table: it was too high and too far away from the couch seatback, so I always ended up with sore wrists and a sore back. To my relief, I was able to solve the problem using a 
I removed the extra leaf from the table, mounted the Jotto desk in front of the shortened table...and it put the PowerBook right in my lap, the most comfortable of all typing positions, while holding it at just the right angle (adjustable, of course) and keeping the hot undersurface off my thighs. No more backaches and sore wrists! When not in use, the Jotto Desk stows neatly behind the other couch...so I can still extend the table if I have company. The desk cost $120, but it was well worth it! I was so pleased with the Jotto desk in the rear that I bought a second one for the front of the coach. These Jotto desks aren't inexpensive, but they are very well engineered and built—and they offer a degree of flexibility that homebrew solutions (and I've seen some good ones) just can't match. For me, they were money well spent. 
Halogen lightsHaving placed the rear computer work area just where I wanted it, I decided to add a light that would shine right in my lap when I was typing (or reading). I found a pair of 20W low-profile GE halogen lamps at Wal-Mart for $20. These tiny 2.5"-diameter, 1" high lamps came with a 12VAC transformer, so I knew I could discard the transformer and run them on Gertie's 12VDC. I mounted one lamp on the ceiling right above the couch and wired it to the 12V supply available at the existing fluorescent fixture, adding a toggle switch to one end of the fixture to control the new lamp. It works very well, projecting a bright beam of light right where it's needed. And the 20W power consumption is actually less than the fluorescent fixture! Here's what it looks like in use. 
Awhile later I turned up another bargain at Target: a 20W halogen desk lamp with a large clamp so you can put it anywhere, and a 14" gooseneck so that you can direct the light, for $9.99. (It's a trendy translucent blue, to boot.) Like the GE halogen lamps, this came with a 12VAC transformer which I cut off and replaced with a standard cigarette lighter plug. I don't really need it right now, but I figure it'll come in handy sooner or later. 
A quieter fanLazy Daze installed two noisy 12V oscillating fans in Gertie: one over the curbside couch and one at the foot of the bed. I replaced both of them with quiet, powerful Fan-Tastic "Endless Breeze" 12V box fans. I made tilt/swivel mounting brackets, so they can be aimed in any direction. Now I can enjoy a gentle, quiet breeze anytime, whether I'm plugged into electric hookups or not! If you're interested in doing likewise, check out the complete plans and instructions on my "Fans" page. Radio-controlled clockThe old Lazy Daze battery-powered clock was long since dead, cooked by the heat of fifteen Arizona summers. Gertie's previous owners had added a modern digital clock module, but I thought it would be nice to have the original custom-made clock/thermometer/hygrometer fully working. But rather than just put in a cheap quartz-controlled battery clock movement, I replaced the old Lazy Daze clock with a new Atomix radio-controlled clock movement that sets itself. (Click the small picture below to see the back of the clock with the new movement in place). 
In case you're not familiar with these clocks, they contain miniature radio receivers that lock onto the radio signal from the NIST atomic clock in Fort Collins, Colorado; thus they are always accurate to within a micro-milliwhisker, and automatically reset themselves twice a year for daylight saving time to boot. The movement I used cost just $16.95 from Klockit, a supplier of all kinds of clock movements at very reasonable prices. I was frankly somewhat skeptical that the Atomix movement would be able to receive the NIST signals when sitting inside an aluminum RV two thousand miles away from Colorado, but I figured that I had nothing to lose by trying—these movements operate as regular quartz clocks when no radio signal is available. I needn't have worried. It took several nights for the clock to lock onto the NIST signal, but it did—I'll never need to set it again unless I cross into a different time zone. One less thing to worry about—I'm in favor of that! |

