RetroVision: a homebrew rear-view video system |
|
Here's how I put together my own video backup camera for a fraction of the cost of a commercial system, using off-the-shelf parts and some basic electronics skills. If you decide to tackle this on your own, be sure you can handle not only the soldering and wiring, but also are prepared to figure out the power connections on the camera end—which may not be obvious. X-10 makes several models of cameras with different wiring setups, and their tech support people absolutely will not help you rewire one of their cameras for 12V DC...so you'd better be confident that you can reverse engineer it yourself. 
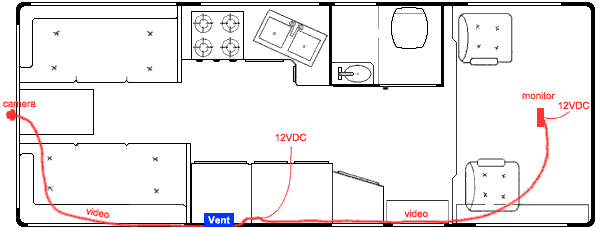
I started by buying an inexpensive color surveillance camera for $60 from www.x10.com. This tiny camera (about the size of an egg) runs on 12VDC (crucial in this application!), is claimed to be weatherproof, and comes with a 15' cable. I mounted the camera above the back window, just below the running lights, and pointed it as far down as I could. My goal was not to replace my mirrors, which work fine for seeing vehicles following me when driving. Rather, I wanted a way to see exactly how close my rear bumper was to anything within a few feet behind me, so I could park without fear of nudging the car behind me or backing into a pole. I ran the video cable across the roof to the refrigerator vent. I knew that this was a good way to get inside the coach without drilling holes in the roof, because the cables from Gertie's solar panels enter by this route. Dropping the video cable down the vent, I drilled a hole in the upper wall of the wardrobe that adjoins it and fished the cable through. I cut off the cable's 12VDC power connector (intended for use with an AC adapter) and wired it directly to a line I took from a ceiling fixture near the wardrobe. (I added an inline fuse just to be safe!) 
The flat white 15' cable attached to the X-10 camera was just long enough to reach to the wardrobe; I used Belden 8218 75Ω coaxial cable to extend the video cable along the upper curbside wall and into the overcab area, securing it with small 3M Command Adhesive removable "Decorating Clips." (I've used these clips a lot in Gertie; they really come in handy for keeping runs of small wires neat—and they can be repositioned at will.) Passing the coax cable under the overcab mattress, I drilled a hole right under the middle of the bed and came out within an inch of the cab's dome light—ideal positioning, since my plan was to mount the video monitor using the bracket originally intended for a CB unit. (I do carry a CB unit, but it's a walkie-talkie type with a built-in weather radio. When using it, I plug it into the cable that comes from Gertie's roof-mounted CB antenna, which I replaced with a Radio Shack fiberglass whip.)
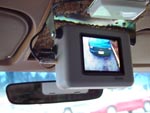
I mounted the finished LCD monitor in such a way that when not in use, it pivots forward and lies flat against the ceiling between the visors, neatly filling the recess intended for the CB. I wired the monitor's 12VDC input to the cable that was meant to provide power for the CB. The system works like a charm, even at night—Gertie's backup lights provide enough illumination for the camera. Total cost was $160, plus a few hours' labor—an eighth of what Camping World wants to charge for a rear-view video system! 
Another way to do this would have been to use a wireless surveillance camera. X-10 sells these for under a hundred bucks; they transmit at 2.4 GHz to a receiver that turns the signal back into video, which can then be fed to a flat-panel monitor of the type I used. The advantage of doing it this way is that you don't have to run wires all the way from the camera in back to the video monitor up front. (You will still have to run a wire to supply 12VDC to the camera, though.) The disadvantage is that you'll have to find a place in or near the cab for the receiver as well as the monitor. It's your choice. |


